Table of Contents
ToggleAn 8×8 bathroom isn’t small, it’s 64 square feet of opportunity. With the right layout, fixture placement, and design choices, this footprint can comfortably accommodate a full bath without feeling cramped. The challenge isn’t the size itself, but how well the space is planned. Poor fixture placement or bulky vanities can make an 8×8 bathroom feel like a closet, while smart configuration decisions create breathing room and functionality. Whether remodeling an existing space or designing from scratch, understanding how to work within these dimensions makes the difference between a bathroom that works and one that doesn’t.
Key Takeaways
- An 8×8 bathroom layout offers 64 square feet of opportunity for a full bath when fixtures are strategically placed along the three-wall or L-shaped configuration.
- Maintaining existing plumbing locations and respecting IRC clearance codes—21 inches in front of toilets and 30 inches in front of sinks—saves money and ensures code compliance.
- Pocket doors and floating vanities can reclaim 6–9 square feet of usable space while large mirrors and clear glass shower enclosures create an illusion of openness.
- Proper waterproofing with products like Kerdi or RedGard is essential around wet areas to prevent costly water damage and mold growth.
- Layered lighting (overhead, task, and accent), adequate ventilation rated at 80–110 CFM, and early planning for storage prevent the space from feeling cramped and ensure long-term functionality.
Understanding Your 8×8 Bathroom Space
An 8×8 bathroom measures 64 square feet, enough for a full bath with tub or shower, toilet, and vanity. In construction terms, that’s about the size of a small bedroom or walk-in closet. It’s considered a mid-size bathroom, not the cramped 5×8 powder room some older homes have.
The actual usable space depends on door swing, wall thickness, and fixture clearances. The International Residential Code (IRC) requires a minimum of 21 inches of clearance in front of toilets and 30 inches in front of sinks. These aren’t suggestions, they’re code minimums in most jurisdictions, and inspectors will check them if you’re pulling permits.
Before planning a layout, measure the space carefully. Note where plumbing lines and drains are currently located. Moving a toilet drain is expensive and invasive, often requiring concrete cutting and new rough-in work. Keeping the toilet in its existing location (or within a few feet) can save hundreds of dollars in plumbing costs.
Consider door placement too. A door that swings inward eats up floor space. If remodeling, switching to a pocket door or outward-swinging door can reclaim 6–9 square feet of usable area. Just make sure an outward swing doesn’t block a hallway or adjacent room.
Best Layout Configurations for 8×8 Bathrooms
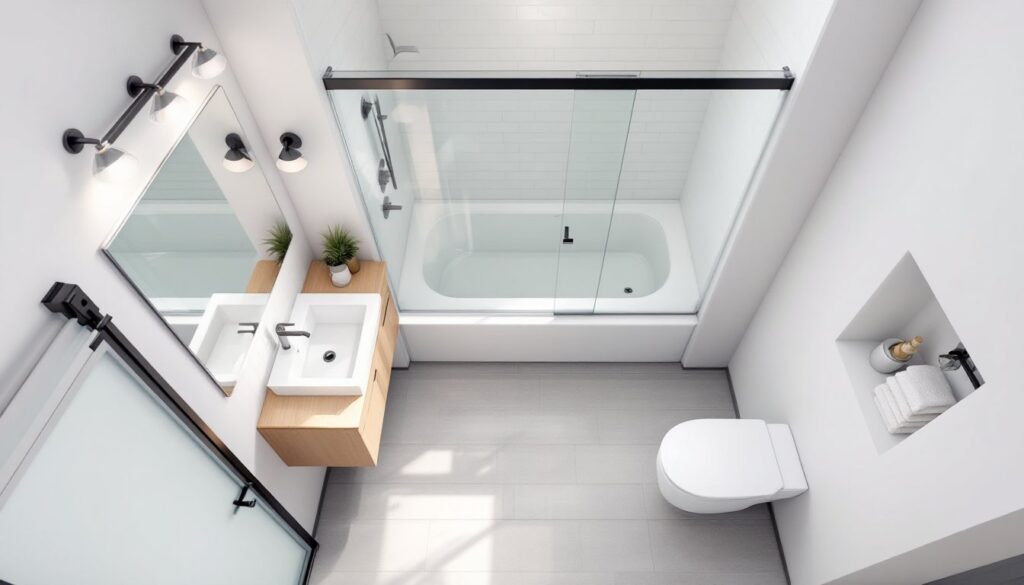
Two layouts dominate 8×8 bathroom design: the three-wall layout and the L-shaped configuration. Each has strengths depending on plumbing location and user priorities.
Three-Wall Layout
The three-wall layout lines up fixtures along three walls, leaving one wall open (usually where the door is). A common arrangement places the tub or shower along the back wall (the 8-foot span), the toilet on one side wall, and the vanity on the opposite side wall or adjacent to the tub.
This layout maximizes open floor space in the center of the room, making it feel larger and easier to move through. It’s the go-to choice when plumbing lines are already positioned along perimeter walls, which is typical in most homes.
For a standard 60-inch alcove tub, position it along the back wall. That leaves roughly 36 inches of wall space on either side, enough for a toilet (typical rough-in is 12 inches from the wall) and a vanity. A 30- to 36-inch vanity fits comfortably without crowding.
If installing a shower instead, a 36×36-inch or 32×48-inch shower base works well. Corner neo-angle showers (the ones with angled glass doors) can free up a few extra inches, but they’re harder to tile and clean.
L-Shaped Layout
The L-shaped layout clusters fixtures along two adjacent walls, typically the back wall and one side wall. This configuration works well when plumbing is grouped in one corner or when the homeowner wants to create a separate wet zone.
A common L-shaped setup places the shower or tub and toilet along the back wall, with the vanity on the adjacent side wall. This leaves the opposite corner open, which can be used for storage, a linen cabinet, or simply left as visual breathing room.
This layout shines when incorporating a larger shower enclosure, say, a 48×36-inch base, because it groups the wet fixtures together and simplifies waterproofing. Tile installation and plumbing rough-in are also more efficient when fixtures share walls.
One downside: the L-shaped layout can feel more enclosed if fixtures are bulky or if lighting is poor. Adequate overhead lighting and a well-placed mirror help counteract this.
Essential Fixtures and Placement Strategies
Fixture selection in an 8×8 bathroom isn’t just about style, it’s about dimensions and clearances. Choose fixtures that fit the space without forcing compromises on code or comfort.
Toilet placement should respect the IRC minimum of 21 inches of clearance in front and 15 inches from the centerline to any side wall or obstruction. A standard round-front toilet has a 28-inch depth: an elongated bowl adds 2 inches. In tight spaces, a round front is the smarter pick.
Wall-hung toilets save 6–9 inches of floor space because the tank is concealed in the wall. But, they require a carrier system and wall reinforcement, which adds $300–$600 in materials and labor if not already roughed in.
Vanity size matters. A 24-inch vanity is code-compliant but feels cramped. A 30- to 36-inch vanity offers more counter space and storage without overwhelming the room. Wall-mounted vanities create the illusion of more floor space and make cleaning easier.
Avoid vanities deeper than 21 inches unless there’s ample clearance. A deep vanity opposite a toilet can make the space feel pinched when someone’s standing at the sink.
For the tub or shower, a standard 60-inch alcove tub fits neatly along one 8-foot wall. If going with a shower, a 36×36-inch base is the sweet spot for comfort and space efficiency. Smaller bases (32×32 inches) are tight for most adults.
Curbless showers are trending and work well in 8×8 bathrooms, but they require sloped subfloor (typically 1/4 inch per foot) and a linear drain. This is structural work, if the bathroom is on a second floor or over a finished ceiling, expect significant remodeling costs.
Lighting and ventilation are often overlooked. The IRC requires either a window or a ventilation fan rated for the room’s cubic footage. For an 8×8 bathroom with an 8-foot ceiling, that’s 512 cubic feet. A fan rated at 80–110 CFM (cubic feet per minute) is appropriate. Vent it to the exterior, not into the attic, that’s a code violation and a mold invitation.
Space-Saving Design Tips for 8×8 Bathrooms
Smart design choices can make an 8×8 bathroom feel significantly larger without changing the footprint.
Use a pocket door or barn door instead of a traditional inward-swinging door. A pocket door slides into the wall cavity and frees up 6–9 square feet. Installation requires a pocket door frame kit (about $150–$200) and clear wall space without plumbing or electrical lines.
Barn doors are easier to retrofit but don’t seal as well for privacy or sound. They work better in a master bath than a shared family bathroom.
Choose a wall-mounted or floating vanity. Elevating the vanity off the floor makes the room feel more open and simplifies cleaning. A wall-mounted vanity requires solid blocking or wall studs capable of supporting 200+ pounds when loaded with the sink, countertop, and contents.
Install a large mirror. A mirror spanning the full width of the vanity, or even wall-to-wall, reflects light and visually doubles the space. Frameless mirrors or thin-profile frames keep the look clean.
Opt for a glass shower enclosure rather than a shower curtain or opaque door. Clear glass maintains sightlines across the room, which prevents visual chopping. Frosted or textured glass offers privacy but still allows light to pass through.
Tile strategically. Large-format tiles (12×24 inches or bigger) reduce grout lines and make the floor or walls feel more expansive. Running floor tiles diagonally can also trick the eye into perceiving more space. Avoid busy patterns or dark grout, which fragments the room visually.
Add recessed shelving. A recessed niche in the shower (built between studs) provides storage without protruding into the room. Standard stud spacing (16 inches on center) gives about 14.5 inches of usable width, enough for shampoo bottles and soap. Frame it during rough-in and waterproof it thoroughly with a membrane like RedGard or Kerdi before tiling.
Maximize vertical storage. Tall linen cabinets or over-toilet shelving units use vertical space that’s often wasted. A floor-to-ceiling cabinet (72–84 inches tall) holds towels, toiletries, and cleaning supplies without crowding the floor.
Choose a compact or corner sink. If the vanity wall is tight, a corner sink or a narrow 18- to 24-inch vanity can work. These are common in European and modern design inspiration galleries where space efficiency is prioritized.
Common Mistakes to Avoid in 8×8 Bathroom Design
Even with good intentions, several missteps can compromise an 8×8 bathroom layout.
Ignoring clearance codes is the most frequent error. Placing a toilet too close to a wall or vanity might look fine on paper, but it fails inspection and feels uncomfortable in use. Always check local building codes, they vary by jurisdiction, and some municipalities have stricter requirements than the IRC.
Choosing oversized fixtures is another common pitfall. A 48-inch double vanity might sound appealing, but in an 8×8 bathroom it dominates the room and forces other fixtures into tight corners. Stick with appropriately scaled pieces.
Skimping on waterproofing is a costly mistake. In wet areas, especially around tubs and showers, use a waterproof membrane on walls and floors before tiling. Products like Schluter Kerdi, RedGard, or Hydroban are industry standards. Skipping this step invites water damage, mold, and eventual subfloor rot.
Underestimating lighting needs makes the space feel cave-like. An 8×8 bathroom needs layered lighting: overhead (recessed cans or a flush-mount fixture), task lighting at the vanity (sconces or a lighted mirror), and accent lighting if there’s a niche or architectural detail. Aim for 75–100 watts of equivalent LED lighting total.
Forgetting ventilation leads to moisture problems. Even with a window, a bathroom fan is critical in humid climates. Run the fan during showers and for 20 minutes afterward to clear moisture. If remodeling, wire the fan to a humidity-sensing switch or timer, it’s a $30 upgrade that prevents mold and peeling paint.
Not planning for storage early on leaves clutter on counters and floors. Integrate storage into the design from the start: medicine cabinets, recessed niches, under-sink organizers, and vertical shelving.
DIYing structural or plumbing work without permits is risky. Moving walls, relocating drains, or altering framing often requires permits and inspections. Unpermitted work can complicate home sales and void insurance claims if something goes wrong. If the project involves anything beyond cosmetic updates, new tile, paint, fixtures, check with the local building department first.